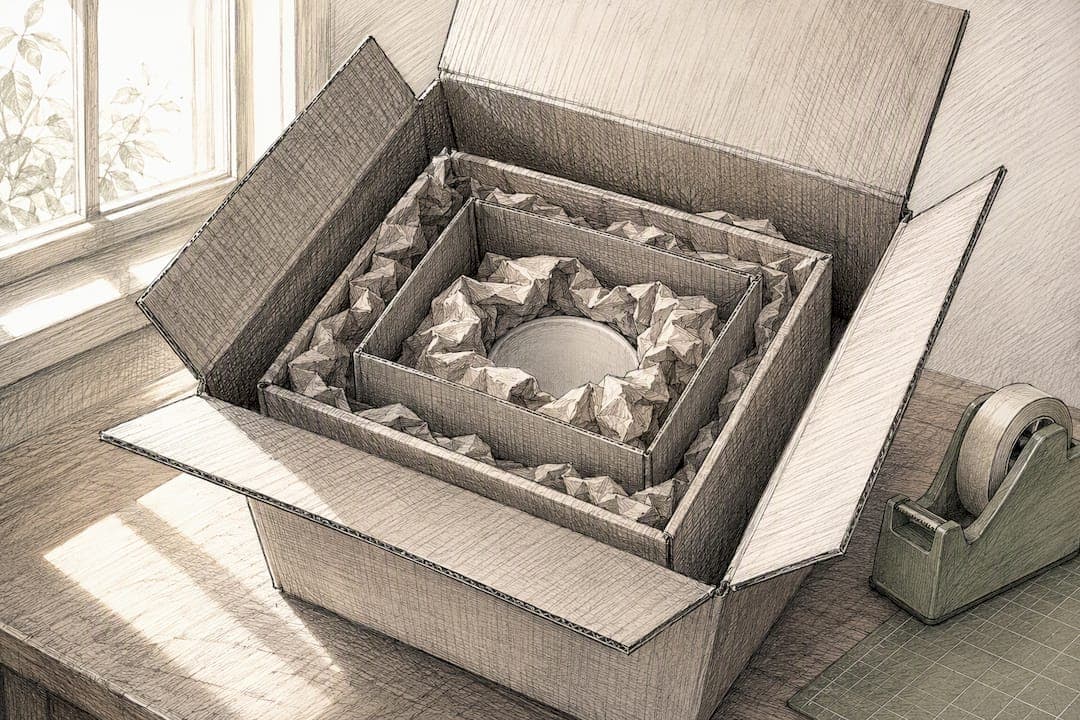
The best way to ship a mug safely is to wrap it in two to three layers of bubble wrap, protect the handle and rim first, then center it inside a rigid inner box with at least 2 inches of cushioning on every side. For thin pottery, hand-painted pieces, or anything valuable, double-box it. Seal that inner box inside a larger outer box with another few inches of padding. Shake the sealed box before you ship. If nothing shifts and nothing rattles, you're done.
TL;DR:
- Double-box fragile or high-value mugs, using a box at least six inches larger than the inner container with three inches of cushioning in between.
- Wrap each mug in multiple layers of bubble wrap, protecting the handle and rim first, and secure with tape without attaching directly to the ceramic surface.
- Always perform a shake test and check for movement before sealing the package to prevent micro-impacts that cause breakage during transit.
- Use a sturdy, double-wall box for long-distance shipping or delicate pieces, and fill all gaps with kraft paper or bubble wrap to prevent shifting.
- Label packages clearly with fragile stickers and photographic proof of packed and sealed boxes to support damage claims if necessary.
Table of Contents
- Materials and Tools You Need to Pack a Mug for Shipping
- How to Pack a Single Mug, Step by Step
- Packing Multiple Mugs in the Same Shipment
- Why Double-Boxing Works, and the Exact Numbers to Follow
- Weighing, Measuring, and Insuring Your Package Correctly
- Quick Checks That Catch Bad Packing Before You Ship
- Common Mug-Packing Mistakes and How to Fix Them
- What Skye Has Learned From Packing Mugs Every Week
- Prefer to Skip the Packing Tape? Sincerely Skye Ships It For You
- Official Resources Worth Bookmarking
- Sources
- FAQ
Materials and Tools You Need to Pack a Mug for Shipping
You don't need a warehouse of supplies to get this right, but using the wrong material is how most mugs end up in three pieces on someone's kitchen counter. Here's what earns a spot on your packing table.
Bubble wrap does the heavy lifting. Keep small bubble (3/16 inch) on hand for wrapping the mug body and large bubble (1/2 inch) for lining box interiors and building a cushioned buffer zone. Kraft paper is your backup and your finishing layer. It's cheap, it won't scratch a glaze the way crumpled newspaper can, and it's excellent for filling odd-shaped gaps. Air pillows work well as a lightweight void filler once the mug itself is fully wrapped, though they're not a substitute for direct cushioning against the ceramic.
Beyond that, you'll want:
- Packing tape (2 inch width minimum, applied generously to seams)
- Scissors or a box cutter for clean cuts, not torn edges that weaken tape adhesion
- A permanent marker for labeling orientation and fragile warnings
- Fragile stickers or handwritten labels placed on at least two sides of the box
- Cardboard dividers or cell packs if you're shipping more than one mug at a time
Box strength matters more than most sellers realize. A single-wall corrugated box (32 ECT, meaning it can withstand roughly 32 pounds of edge crush test pressure) works fine for one mug going a short distance. Double-wall board is the safer call for cross-country shipping, heavier stoneware mugs, or anything you can't afford to lose. As for sizing, a standard 11 to 12 ounce mug typically fits a 6x6x6 inch inner box once wrapped; larger or novelty mugs usually need a 7x7x7 or 8x8x8 inch box. Check common mug dimensions before you buy boxes in bulk so you're not guessing at fit.
Pro Tip: Buy your inner boxes one size larger than you think you need. It's far easier to add cushioning to a slightly roomy box than to force a snug fit that leaves no room for padding.
If you're shipping a set, a proper dish pack box with built-in cell dividers beats a plain carton every time. Craft stores, U-Haul locations, and office supply chains typically carry small bubble wrap rolls and mug-sized boxes for under $10, so sourcing locally rarely requires a special trip.
How to Pack a Single Mug, Step by Step
This is the workflow that matters most, because a single mug shipped to one customer is the situation most hobbyist sellers face every week. Get this right and everything else in this guide is just scaling up.
- Inspect the mug and take a photo. Check for existing chips, cracks, or glaze flaws before you wrap anything. This photo protects you if a damage claim comes up later.
- Wipe it dry and remove loose debris. Any moisture trapped under bubble wrap can lead to mildew smells during transit, especially in warmer months.
- Protect the handle and rim first. Slip a small wad of tissue paper or a thin foam sleeve around the handle, since it's the most likely breakage point on impact.
- Wrap the entire mug in 2 to 3 layers of bubble wrap, bubble side facing in toward the ceramic. Tape the wrap to itself, never directly to the mug's surface. Tape on glaze can pull off decals or printed designs when removed.
- Line the inner box with about 2 inches of cushioning on the bottom before placing anything inside. Loose-fill peanuts, crumpled kraft paper, or cut bubble sheeting all work, but UPS's own packaging guidance specifically warns that loose-fill can shift over time. So, pack it firmly and check for settling.
- Center the wrapped mug in the box, keeping it away from every wall, corner, and the lid.
- Fill the sides and top with the same cushioning material until the mug can't shift in any direction.
- Seal the inner box with H-taping. Run tape down the center seam and across both end flaps in an "H" pattern for real seam strength, not just a strip down the middle.
- Decide if you need to double-box. High-value pieces, thin-walled pottery, hand-thrown ceramics, or anything shipping long distance all call for a second layer of protection.
- If double-boxing, center the sealed inner box inside a larger outer box with 2 to 3 inches of cushioning on all sides, following UPS's own sizing rule.
- Perform the shake test. Hold the sealed box and give it a firm shake. Anything you hear or feel moving means you're not done.
- Photograph the packed inner box and the sealed outer box before you close it up for good. These photos are your evidence if a carrier questions a damage claim.
A common mistake is skipping steps 9 and 10 to save a few dollars on a second box. That math rarely works out. A $3 to $5 outer box and an extra layer of cushioning cost far less than replacing a broken mug, refunding a customer, or losing a repeat buyer over a preventable break.
Packing Multiple Mugs in the Same Shipment
Shipping a set changes the math, because now the biggest threat isn't the outer box, it's the mug sitting next to it. Ceramic against ceramic is where cracks start, even through a single layer of bubble wrap.
- Wrap every mug individually and fully before placing any of them in a box together.
- Never let two wrapped mugs touch directly. Even with padding on both, repeated contact during transit vibration can chip rims and handles.
- Use cardboard dividers or purpose-made cup cell packs to keep each mug in its own compartment.
- Add a layer of bubble sheeting between rows if you're stacking mugs in a taller box.
- Cap most standard boxes at four to six mugs, depending on size and box strength. Overloading a box compresses the padding at the bottom and defeats the cushioning for whatever sits underneath.
- For larger orders, split the shipment into separate cartons rather than one oversized box. It's easier to pad two medium boxes evenly than one box stuffed to capacity.
- If you're shipping wholesale quantities, palletizing with reinforced corner protection is worth exploring, though that's rare territory for hobbyist sellers.
Dividers do more work than most sellers give them credit for. A $6 cell-pack insert that holds six mugs upright and separated is often the difference between a clean delivery and a box full of broken handles.
Why Double-Boxing Works, and the Exact Numbers to Follow
Double-boxing isn't just a "safer, just in case" habit. It's a specific, measurable buffer system that UPS's own guidance spells out: the outer box should run about 6 inches larger than the inner box in every dimension, with roughly 3 inches of cushioning filling the gap between them.
That gap is the entire point. When a package gets dropped, tossed onto a conveyor, or stacked under heavier boxes, the outer box and its cushioning absorb the first wave of impact before it ever reaches the inner box. The inner box, already padded and sealed around the mug, absorbs whatever energy makes it through. Two layers of defense instead of one.

You don't need to double-box everything. A sturdy, thick-walled stoneware mug shipping a short distance in a well-padded single box is usually fine. But thin-walled pottery, delicate glazes, hand-painted or one-of-a-kind pieces, and anything traveling coast to coast deserve the extra layer. The decision rule is simple: if replacing the item would genuinely sting, double-box it.
A few practical notes on execution: use a box strong enough to hold its shape once cushioning is added, don't let the inner box touch any wall of the outer box, fill evenly on all six sides (not just the bottom), and finish outer seams with the same H-tape pattern you used on the inner box.
Weighing, Measuring, and Insuring Your Package Correctly
Here's a mistake that costs sellers real money: buying postage before the box is finished. Package the mug completely first, then weigh and measure it, because postage rates depend entirely on the final packed dimensions and weight, not on the size of the empty mug or box you started with.

That extra cushioning you added for safety adds bulk, and bulk affects price. Carriers calculate what's called dimensional weight, meaning a large, lightweight box can cost as much to ship as a smaller, heavier one. Padding your box generously raises its dimensions and can push you into a higher pricing tier, so oversizing a box "just to be safe" isn't free.
Once the box is sealed and weighed, follow this sequence:
- Record the final length, width, height, and weight.
- Note the destination ZIP code and your own ship-from ZIP.
- Decide on a declared value for insurance purposes.
- Compare rates using the USPS Retail Postage Price Calculator or your carrier's own rate tool.
- Purchase tracking and, for anything with real resale value, add insurance.
For a single lightweight mug traveling domestically, USPS tends to be the cheaper option, especially with flat-rate boxes when your packed dimensions happen to fit one. For higher-value pieces, multi-mug sets, or shipments where you want stronger chain-of-custody tracking, UPS or FedEx often make more sense despite the higher price.
| Consideration | Best Fit |
|---|---|
| Single lightweight mug, short distance | USPS, often flat-rate if size allows |
| Fragile or high-value single piece | UPS or FedEx with declared value insurance |
| Multi-mug wholesale shipment | UPS or FedEx ground service |
| International shipment | Compare carrier customs handling and insurance limits directly |
One more regulatory wrinkle worth knowing: USPS packaging rules for liquids in breakable containers, including options like ISTA 3A certified packaging, only apply when the mug actually contains liquid at the time of shipping. An empty mug follows standard fragile-item rules, not the stricter liquid-container standards.
Keep your receipt, tracking number, and packing photos together until delivery is confirmed. If you ever need to file a damage claim, that documentation is what gets it approved instead of disputed.
Quick Checks That Catch Bad Packing Before You Ship
A few minutes of testing before you seal the box saves a lot of grief later. Skip these and you're shipping on hope.
- Shake test: hold the sealed box firmly and shake it side to side and up and down. If you hear or feel any movement, add more filler and repack before sealing again.
- Firmness check: press gently on each side of the box. It should feel solid, not soft or able to flex inward toward the item.
- Photo checklist: the unwrapped mug, the wrapped mug, the loaded inner box, the sealed outer box, and the finished label.
- Weight sanity check: does the box feel appropriately heavy for its size? A suspiciously light box for its dimensions often means insufficient cushioning.
- Label check: fragile stickers on two sides, "this side up" markings if orientation matters, and a legible shipping label under clear tape.
If any check fails, open it back up. Repacking now costs five minutes. A broken mug costs a refund, a return shipment, and probably a lost customer.
Common Mug-Packing Mistakes and How to Fix Them
Most breakage complaints trace back to one of four repeatable errors, and every one of them is easy to fix once you know to look for it.
Movement inside the box is the top cause of breakage. If the mug shifts even slightly during transit, repeated micro-impacts against the box wall will eventually crack it. Fix it by adding more cushioning material until the shake test comes back silent.

Wrong box size causes problems in both directions. Too small, and there's no room for cushioning. Too large, and the mug has room to travel and slam against the walls. Match the box to the wrapped mug's size plus your required cushioning depth, not to whatever box happens to be sitting around.
Newspaper ink and tape on glaze are two separate problems with the same result: a damaged finish. Newspaper can transfer ink onto porous or unglazed surfaces, and tape applied directly to a printed or glazed mug can pull off finish or decals when removed. Use kraft paper or bubble wrap instead, and tape only to itself.
Under-taped seams fail under the weight of stacked packages or rough handling. A single strip of tape down the center seam isn't enough. Reinforce every seam with an H-tape pattern across both flaps.
Pro Tip: Keep a small stash of pre-cut bubble wrap sheets sized for your most common mug dimensions. It turns a 10 minute packing job into a 3 minute one without cutting corners on protection.
What Skye Has Learned From Packing Mugs Every Week
Shipping mugs stops being intimidating once you build a repeatable station, and that's the real unlock for small sellers. Pre-cutting bubble wrap to standard lengths, keeping a shelf of pre-measured inner boxes in the sizes you sell most, and photographing every packed order before sealing turns a slow, anxious process into a five-minute routine you barely think about.
The materials matter less than the consistency. A shop that packs the same way every single time, with the same box sizes, the same layer counts, and the same photo checklist, will always outperform a shop that improvises per order. That consistency is also what makes a damage claim easy to win instead of a coin flip.
If you're building your own packing station, start with two or three standard inner box sizes that match the bulk of what you sell, keep bubble wrap in two thicknesses, and never skip the shake test, even on the hundredth mug of the week.
— Skye
Prefer to Skip the Packing Tape? Sincerely Skye Ships It For You
If reading twelve steps about bubble wrap and H-tape sounds like more than you signed up for, there's a simpler route: let the shop handle the packing and shipping for you. Every mug and handmade exclusive tumbler sold through the shop is packed and sent out by experienced packers, which means you skip the box-buying, the layering, and the guesswork entirely.
Whether you're shopping for yourself or picking out a gift, browsing the custom mug collection gets you a piece designed with whimsical, crafting-culture artwork, shipped without you ever touching a roll of bubble wrap. Head to the shop to see current mugs and tumblers, or check out an E-Gift Card if you're not sure which design to pick.
Official Resources Worth Bookmarking
For packing specifics straight from the carriers, keep these on hand:
- UPS packaging tips for box selection and two-box guidance
- USPS Retail Postage Price Calculator for accurate rates after packing
- ParcelPath's mug shipping guide for fragile ceramics specifics
Sources
- How to Pack a Box or Pallet for Shipping | UPS - United States
- Retail Postage Price Calculator
- Can you mail liquids? — EasyPost blog
- How to ship a mug | ParcelPath
- Domestic Mail | USPS postal bulletin
FAQ
What Is the Best Way to Mail a Mug Safely?
Wrap the mug in two to three layers of bubble wrap, protect the handle and rim first, and center it in a rigid box with at least 2 inches of cushioning on every side. For fragile or valuable pieces, double-box it using UPS's two-box method, which adds an outer box roughly 6 inches larger with 3 inches of cushioning between the two.
How Much Does It Cost to Ship a Mug?
There's no fixed average cost, since postage depends on the final packed weight, dimensions, and destination rather than the mug itself. Use the USPS Retail Postage Price Calculator after you've finished packing to get an accurate quote.
How Do I Send a Mug in the Mail Without It Breaking?
Wrap it thoroughly, cushion it on all sides inside a snug inner box, and eliminate any room for it to move. Run the shake test before sealing. If you hear or feel movement, add more filler and repack rather than shipping as is.
How Do You Mail Glassware or Ceramics Without Breaking Them?
The core rules stay the same as for mugs: wrap generously, cushion fully, and remove all movement inside the box. Thin-walled or high-value glassware and ceramics benefit most from double-boxing, since the extra buffer absorbs shocks before they reach the item itself.
Does Sincerely Skye Ship Mugs for Buyers?
Yes. Mugs and tumblers purchased through the Sincerely Skye shop are packed and shipped by the shop directly, so buyers don't need to handle any of the packing steps covered in this guide.